Monday, May 30, 2011

Personalized Magnets

Its been almost 2 months since I've been on here, ooops! I've been busy with work & whatnot, but don't fret..I never intended on giving up on my blog. I should be posting more often from here on out!

So this weekend I made some magnets for our fridge. If you are craft-a-holic like me, you may even have all of the needed materials in your house!

I made the magnets because there isn't much of a choice of cute looking magnets that are cheap in price & strong...so why not. I am not the first to make glass marble magnets (by far), but they could possibly be the cutest!

Step 1: Cut out circles of scrapbook paper to fit the size of the glass beads. I cut purposefully for most of the circles, such as the paw prints. You can trace them & cut them with scissors or you can use a hole punch like I did. My hole punch was 3/4". You only need one circle per bead that you will be using. Some people use magazine pages by the way, but I was worried that they would be too transparent with the glue.
Step 2: Use school type glue to glue the circle to the glass bead (picture side toward the bead). Make sure that the entire bead (the flat side that glues to the paper) has glue covering the entire side. Also make sure that you don't have too much paper, so that you don't saturate the paper too much.
Step 3: Let dry overnight!
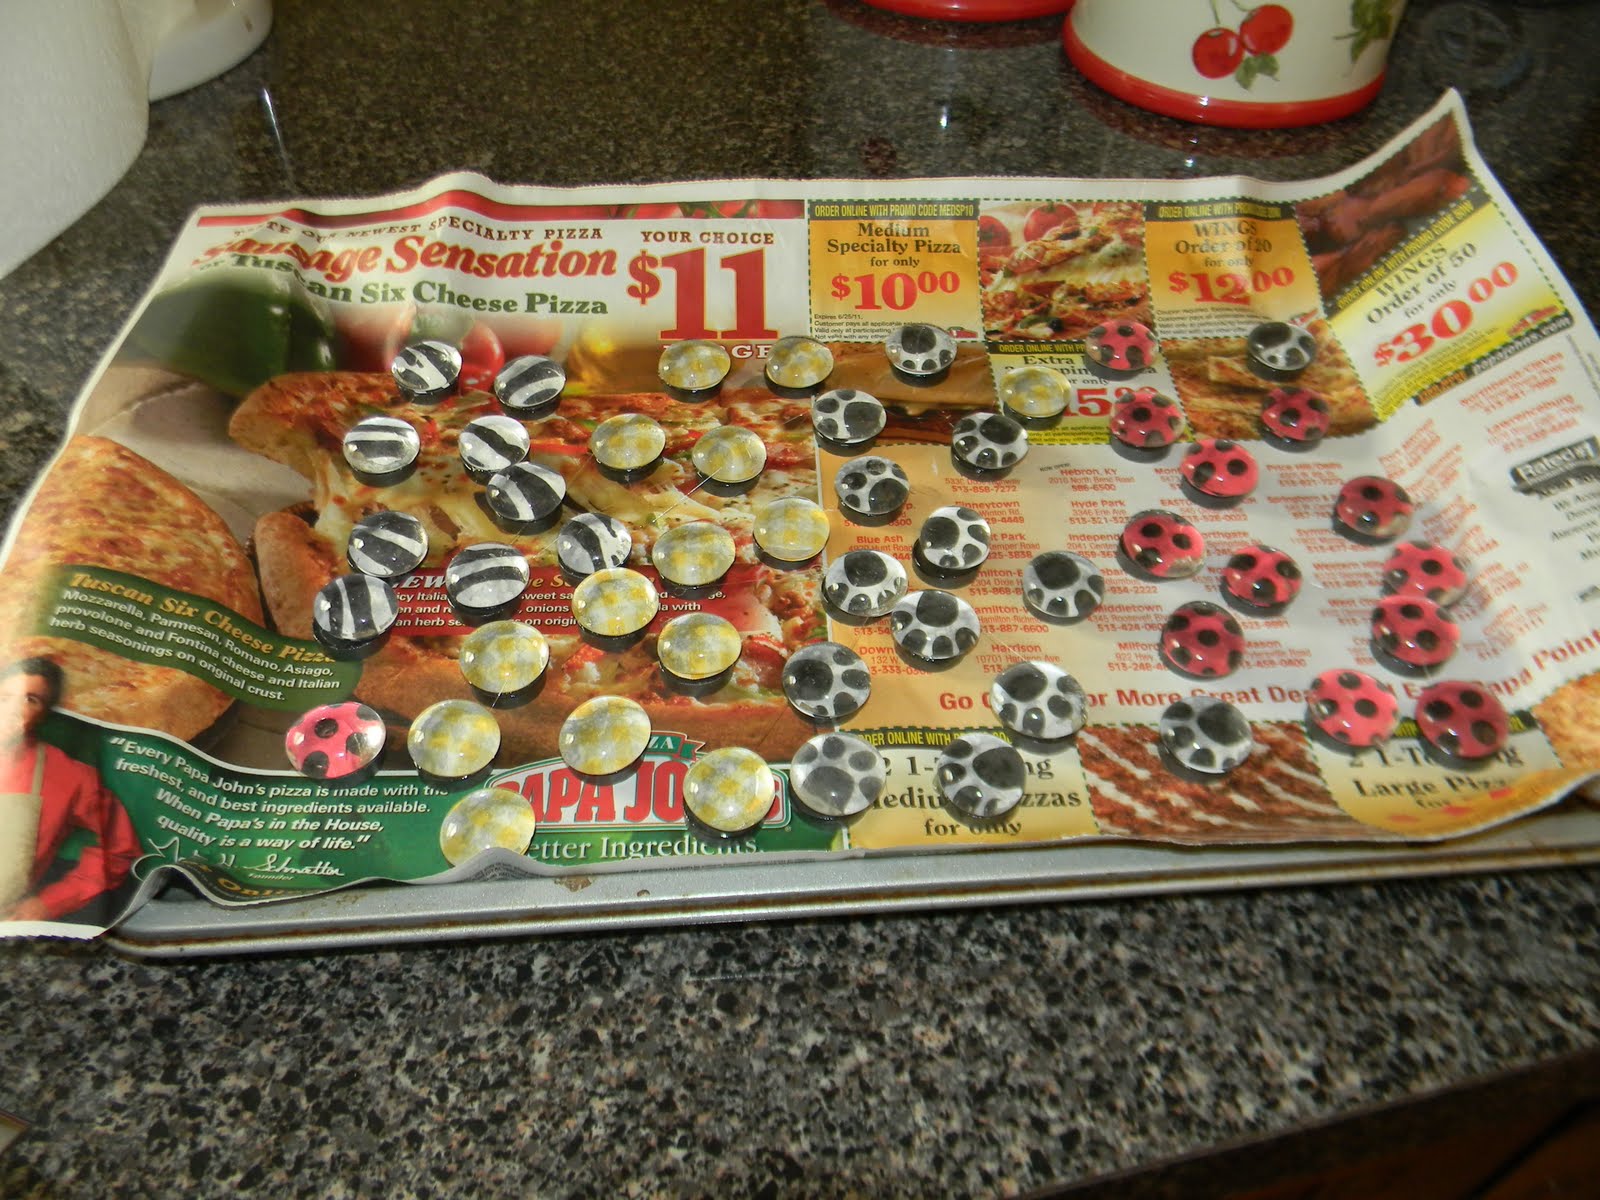
Step 4, 5, 6, & 7: After glass beads & paper circles are dry. For the next step, there are several types of glue that you can use, I used Surebonder 9001 (found at Hob Lobb) which doesn't require clamping (such as Gorilla glue). What I found easiest was to get a baking tray, cover it in a pizza ad (an additional step to prevent contamination to the baking sheet), and lay all the magnets out on top. I then smeared glue on the top of each magnet making sure that they were completely covered (but again not too much). I then took the glass bead paper combo a put one on each magnet. The benefit of using the baking sheet was that the magnets stayed in place & I could apply a lot of pressure on the magnet. My glue required that I let my project dry for 24 hours. I think I only had the restraint to wait 22.

*Please note, school glue will probably not be strong enough for these steps!
Step 8: After dried, take off of baking sheet (clean the baking sheet). & put the magnet on your desired magnetic surface!

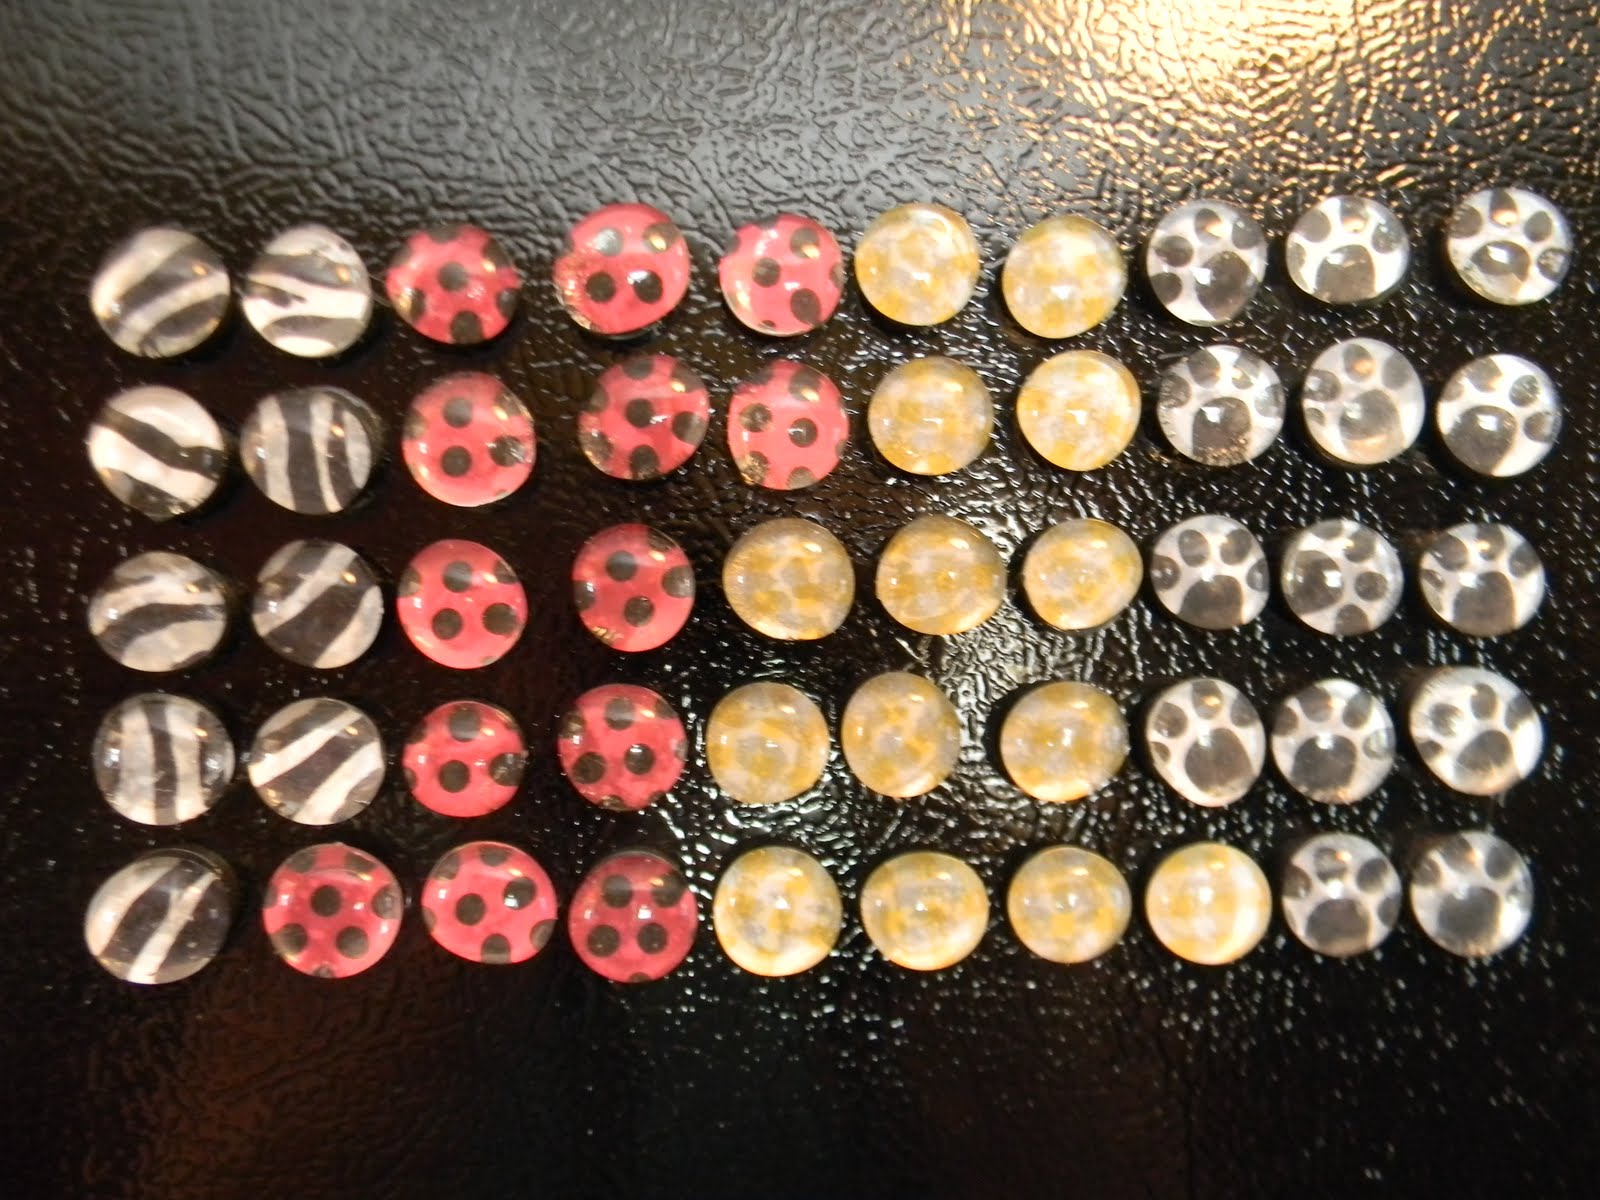
I used the particular designs because they match the colors of my kitchen. The red one was supposed to just look like red with black polka dots, but with the bead..they look more like lady bugs! I still love them though. The yellow & white magnets turned out the worst out of all of them. The paper was a light yellow and white checkered design. I think that the glue saturated the paper too much. They still look nice, its just hard to tell what the original design was.

If you have small children in the house make sure to keep these magnets away from them!

Enjoy!

-Alex

Friday, April 1, 2011

Tennis Ball Birthday Cake

I am not the best with frosting in a creative manner or making food into objects that other people can recognize. I think that today I did pretty well, however. My MIL had to work this morning & has a lot going on this week, so I offered to make my little BIL's 15th birthday cake! He just started playing tennis, on a team, so a tennis related cake seemed to be in order. My first thought was a drawn tennis racket on the side of the cake. Its a good thing that I did not go through with it, it probably would have looked like a roughly drawn hair brush, LOL.

I used two boxes of Betty Crocker confetti cake. It was on sale for $1 a box! I go between Betty Crocker & Pillsbury, neither have steered me wrong. I made the cakes in two seperate 9 x 9 pans. Jay flattened off the top of the soon to be bottom layer by using a bread knife. I then cut some of the edges off of the top layer.

The icing & food coloring used. I *LOVE* my neon food coloring! Each container of icing required 30 drops of neon green food coloring to be the awesome Wilson tennis ball color!

The layers before I added them together. I actually thought they would fit in my glass cake stand. Good thing that I tested this theory out before I frosted the cake! 
   
Looks yummy right?
First layer. I thought of keeping it white, but then, won't it be more fun to cut into the cake to see more GREEN frosting :) ?
The beginning of the "felt". I used a Pampered Chef Icing Tool to make the texture.
Its almost done! I did spread the white part a little more. This is the result of 3 containers of white icing!
Ta da! I don't have the best handwriting, in icing, but you can at least read it :)


What is the coolest baked item that you ever made?

Tuesday, March 29, 2011

Plastic Easter Egg Wreath

Its been quite a while since my last post. A lot have things have happened during that time. My grandpa passed away, I have been to Toledo 3 times in the last month, & having two jobs keeps me pretty busy as well. I will post all of the crafts that I have made since my last post- today. Hopefully things have returned back to normal & I will post more often :)

I have wanted to make a plastic easter egg wreath ever since I saw one somewhere online last Easter. After looking at several tutorials, this is the one that I used to make my wreath:

http://cindis.blogspot.com/2009/03/moms-do-some-grass-this-month.html

I will not list out the directions again, since Cindi did a pretty good job the first time :) To make my wreath I used an old box that we had left over from moving into our house, easter grass that I already had, coordinating ribbon from our wedding, hot glue/hot glue gun, & the easter eggs were the only thing that we had to buy! My wonderful husband bought me a pack of 140 for $5 at Walgreens :) If you don't mind putting the eggs together, they are a great deal!


Some things I would change: 1) If I had picked out the eggs, I may have picked out pastal colored eggs 2) I would have liked to have a large bow on the top of the wreath, but I don't know how to make those & 3) if I picked out the grass for this project I would have picked something out that was lighter & more see through.

So, what do you think?

Thursday, February 10, 2011

Easy Headbands & Kids Bow Tie For Dress Up

Forgive me if there are any gramatical errors. I am typing this blog quickly right before I go to bed :)
Today I tried to make a headband for the first time. I basically figured out how to make it by looking at 15 different blogs tuts & going from there. This is a great project to do! It doesn't take too long & does not use many tutorials! I simply used fabrics scraps from other projects & I happened to have elastic on hand as well. Here is generally how I made them:

1. Select your fabric & iron it
 2. Figure out how wide you want your fabric, add a little bit for seam allowance, & fold in half. Normally I would have pinned it, but I don't know where my pins are at the moment. After doing this project, I am not sure if I really need them to make a headband. Also, put up to your head & figure out how long you want the fabric, this will depend on your head size, but it will probably be somewhere around 17 inches. Make sure that the fabric will reach past your ears when it is a headband.
 3. Sew it & make sure to double stitch for extra security.
 4. You don't have to do this, but if you do have pinking shears, you can cut off the extra fabric to cut down on the bulkiness.
 5. Turn fabric right side out. Fold seam so that it is in the middle of the headband. Iron the new creases & fold the ends in (that have not been sewn).
 6. Put elastic in the open end & sew the fabric & elastic together. How much elastic you use again depends on your head. Some people may use 3 inches. I held it up to my head & then used a permanent marker to show where I should meet the other side of the fabric.
 7. Sew the other side & enjoy your new headband!

 **I ended up making one headband for myself (as practice) & the two below are a gift!


Here is my cute imperfect bow tie. I did not make a tutorial of this because it was a rush job. I made it quickly knowing that it would be used to dress up & not at an actual event. At my part time job, I work with 3-5 year olds that love to play dress up & wedding. I figured that the boys needed a bow tie! The bow tie is attached to a loop of elastic by the way that the kids can just pull over their heads.

Sunday, February 6, 2011

Bengals Dog Bandanna

So the Bengals aren't playing in the Super Bowl, but my dog & I decided that we are going to dress for our favorite team today anyhow. I used some old Bengals fabric left over from pj pants that I made for Jay years back, used an old bandanna as a pattern, cut 2 triangles out, & tada a doggie scarf! The scarf is rolled up twice on the dog by the way :)


Canvas Painting

So Jay & I are finally decorating our bedroom after almost 2 years. Family painted our bedroom a light blue right before we moved in. I thought that I would like the blue, but it turns out that I like gray walls much better :) Anywho, our color scheme is now gray walls, with white, black, and lime accents & the occasional orange.

I have learned to free hand zebra stripes pretty well (I have 2 large: red, yellow, & black zebra stripe canvases in our dining room). I also LOVE zebra stripes, so I did a small 8 x 8 for our room. After that I am done painting zebra stripes..I think. I also painted the 8 x 8 chandelier with a stencil. I am not done with the chandelier..its a little blurry & Jay said that I need to highlight it. Hello, I taught myself to paint, I only know how to paint things one dimensional. Jay painted the large one. I LOVE it! Can you tell who has taken more art classes? Jay :) I told him that when we are 40 & we can afford them, I am taking art classes for adults so that I can learn how to shade, use materials other than acrylics, & draw.