I have made at least 10 purses, most of them with the same pattern. I was getting tired of that pattern & looking for something with a quicker assembly. I had been wanting to buy this pattern for the last few months, but the $15.95 price tag for the pattern kept me at bay. Finally Hobby Lobby had Simplicity patterns for $1 each, so I bought just a few..
The pattern that I used. You can buy this pattern at Jo Ann Fabrics, Hobby Lobby, & many other places. This week I made the style of purse pictured in the bottom right:
Here is my finished product! I'm trying to pick more basic colors for myself these days:
Here is the inside of the bag. Its hard to tell, but the inside of the bag is dark black with gold on it. It looks very nice in my opinion. I know that i am breaking the keep the inside of your bag a light color, but oh well. I also added a magnetic snap to the inside pocket (this was not included in the pattern) because I like to have my pockets closed off a bit so that things do not fall out easily.
How my bag looks when almost full:
Here is how I feel about the pattern:
Likes: Overall, its a great pattern. There aren't many pattern pieces needed to cut out for this bag. The less the pattern pieces that you have to cut out, means less fabric to cut out, and less to sew together. I was looking for a purse pattern that made me feel like I wasn't walking around with a purse that screamed "I'm homemade" which is how I feel at some of my purse attempts for myself in the past. I like the shape. The proportions on the bag are great. Sometimes I have to adjust the straps on a bag because I don't think that they are made long enough, but this one was great--no adjustment needed.
I have to hit on it again, I love how quickly I was able to sew the bag. Normally patterns suggest that you sew your straps & then pull them inside out, that takes forever. This bag simply had you fold them in a few times & sew. No reversal needed.
Keep in mind this bag is on the medium size. You could figure that out by looking at the measurements on the back, but I think often people are fulled by the picture on the front & they figure that the bag will be bigger. I normally carry large bags, but I wanted to make a medium bag because I am trying to get used to carrying less personal items around with me. Once I have my baby in November, I very well may not be carrying a purse at all on a regular basis and just throwing some of my items in a diaper bag. That is why I want to start figuring out now what I really need to carry with me.
The instructions called for an interlining, which I have not done before. I ended up using a thick stiff white bed sheet as my interlining material. It gave the bag just the right amount of stiffness and I am very happy with the result.
Dislikes: Not too many. The everyday price is pretty steep, but so are most patterns these days. I think that this pattern makes certain assumptions that you know exactly what to do with no instruction. For example, it will tell you to baste something (which is temporarily sewing something), actually it mentioned basting A LOT, then it never tells you when to remove the basting. Not to mention, with how many times the instructions said to baste material together, it seemed like the bag hardly required any permanent stitching. I ending up ignoring the "baste" instructions for the most part & went ahead and just sewing the material together. Other than that, I loved the pattern & I plan to make a dark denim version of this purse as well as a few out of the random material that I already own...in the near future!
Wednesday, June 27, 2012
Thursday, January 5, 2012
Crafts
I've been a very bad craft blogger! I haven't posted anything since this summer. I've been unemployed for the last several months and spent a lot of time going to interviews, updating my resume, and looking for jobs. Luckily, I have a job starting in a few weeks! Hopefully this means more craft posts in the near future!
Meal Plan
(*Skip the paragraphs preceding the meal plan if you have already been following my meal plans.)
Not in any regards do I consider myself a chef, food guru, or anything of the like. However, I have found something that works for myself and my husband. It all started once I became unemployed and was looking for avenues to amuse myself. I decided to scrutinize some of my frequent tasks and decide if I could improve their efficiency in any way . My old way of grocery shopping was going to the grocery store with maybe a meal or two in mind, but for the most part just grabbing some meat, some sides, and hoping for the best. This often resulted in my husband and I saying "What do you want to eat? I don't know, what do you want to eat?" One person might not feel like eating a certain side or making the decision, so making dinner got kind of annoying at times. I started to think about how cafeteria's usually post the meals that they will have for the week on a chalk board, calendar, or something like that. If you liked Taco Day and you knew it was on Thursday's.. you could plan not to pack a lunch that day. Long story short, I decided that whenever I would go shopping, I would plan out 14 meals in advance and print them out on a list for the fridge. We eat the meals in whatever order we wish and we just cross them off when we make them.
I wasn't sure if the meal plan was going to work out, it was just something to keep me busy. 5 months later I am still printing out my meal plans and posting them on the fridge! It may sound like a lot of time dedicated to meal planning, but it the long run, it saves me time on a daily basis. Not to mention that I also end up buying less food at the grocery store because I know what I am making for dinner. I plan on continuing my meal planning even as I get busier and start to have a family. I can plan the meals anytime that I want to before I go out shopping and then I don't have to think about what to eat again until our next meal plan.
Sometimes my meal plans are pretty simple, other times more demanding of time. They are often nothing special, but if they inspire someone else to make something different or become more organized with their meal planning, that is fine with me.
My Meals: My goal is to make most things from scratch. I try to avoid (for the most part) making frozen foods for dinner (other than frozen pizza and vegetables) to avoid the preservatives. I have at least 2 "easy meals" out of each 14, and possibly more if I am expecting a busy week. I usually list 14 meals out in each meal plan, but I will sometimes list less if I know that we are eating out one night or if I made something leftover from the last meal plan. Most often my meals include a meat, a vegatable, and another side to be well rounded!
I'm still learning...do you have any tips for me? Any healthier options to what I am making?
Not in any regards do I consider myself a chef, food guru, or anything of the like. However, I have found something that works for myself and my husband. It all started once I became unemployed and was looking for avenues to amuse myself. I decided to scrutinize some of my frequent tasks and decide if I could improve their efficiency in any way . My old way of grocery shopping was going to the grocery store with maybe a meal or two in mind, but for the most part just grabbing some meat, some sides, and hoping for the best. This often resulted in my husband and I saying "What do you want to eat? I don't know, what do you want to eat?" One person might not feel like eating a certain side or making the decision, so making dinner got kind of annoying at times. I started to think about how cafeteria's usually post the meals that they will have for the week on a chalk board, calendar, or something like that. If you liked Taco Day and you knew it was on Thursday's.. you could plan not to pack a lunch that day. Long story short, I decided that whenever I would go shopping, I would plan out 14 meals in advance and print them out on a list for the fridge. We eat the meals in whatever order we wish and we just cross them off when we make them.
I wasn't sure if the meal plan was going to work out, it was just something to keep me busy. 5 months later I am still printing out my meal plans and posting them on the fridge! It may sound like a lot of time dedicated to meal planning, but it the long run, it saves me time on a daily basis. Not to mention that I also end up buying less food at the grocery store because I know what I am making for dinner. I plan on continuing my meal planning even as I get busier and start to have a family. I can plan the meals anytime that I want to before I go out shopping and then I don't have to think about what to eat again until our next meal plan.
Sometimes my meal plans are pretty simple, other times more demanding of time. They are often nothing special, but if they inspire someone else to make something different or become more organized with their meal planning, that is fine with me.
My Meals: My goal is to make most things from scratch. I try to avoid (for the most part) making frozen foods for dinner (other than frozen pizza and vegetables) to avoid the preservatives. I have at least 2 "easy meals" out of each 14, and possibly more if I am expecting a busy week. I usually list 14 meals out in each meal plan, but I will sometimes list less if I know that we are eating out one night or if I made something leftover from the last meal plan. Most often my meals include a meat, a vegatable, and another side to be well rounded!
Meal Plan
- Skyline (plus spaghetti, onions, cheddar cheese, & oyster crackers on the side)
*The Skyline that we use comes frozen in a tub and has several servings of Skyline.
- BLTs (the usual, other than turkey bacon instead of regular bacon)
- DIY Pizza
*This time we will be using Kroger pizza dough (in a bag), Kroger Pizza Sauce, Onion, and Shredded Chicken
- Frozen Pizza
- Spaghetti, Homemade Garlic Bread
*Homemade Garlic Bread is made by taking a slice of bread, spreading butter on it and garlic powder, and it putting it in the oven at 200° until butter is melting and crispy
- Hillshire Farm Turkey Kielbasa, Green Beans, Macaroni & Cheese
- Taco Salad
*Salad is made of Lettuce, onion, and tomato, topped with cooked beef, shredded cheese (taco or cheddar), Catalina Dressing, Sour Cream, and Salsa
- Tortellini with Pesto, Salad
- French Onion Soup (A), Soup Of Choice (J), & Panini’s
- Steak, Baked Potatoes, & Broccoli
- Soft Tacos, Refried Beans
- Hot Dogs (with Buns), Cream Corn, Au Gratin Potatoes
- Hot Dogs (with Buns), Cottage Cheese, Home Made Fries
I'm still learning...do you have any tips for me? Any healthier options to what I am making?
Saturday, July 30, 2011
Ribbon Headbands!!
Hello loyal followers! I just realized that I haven't posted in over a month! Sorry, its been a rough month & I didn't really feel like posting. I did however do a few projects in the last month, so I will have more to post in the next few weeks.
I've been on a kick for the last two years. I have slowly been trying to make more & more of the things that I use on a daily basis. In addition to that, if I use something everyday & I see where there could be improvement..that fires me up even more.
I LOVE wearing headbands! Why? I hate having hair in my face and I think they are cute. I do however strongly dislike a good portion of the elastic headbands that I own. They often slip off my head I have to spray hair spray directly on them & the surrounding hair to help them stay in place. After looking around online, I realized that some people are making headbands with velvet ribbon on the bottom- which keeps them from slipping. I have made three already and 1) I LOVE them and 2) gosh darn, they don't slip!
Click here to see the tutorial that I followed
Not only that bloggers post extremely helpful, but I also think that her blog name is really cute "Holy Craft".
Here are some pictures from the headbands that I made!:
I've been on a kick for the last two years. I have slowly been trying to make more & more of the things that I use on a daily basis. In addition to that, if I use something everyday & I see where there could be improvement..that fires me up even more.
I LOVE wearing headbands! Why? I hate having hair in my face and I think they are cute. I do however strongly dislike a good portion of the elastic headbands that I own. They often slip off my head I have to spray hair spray directly on them & the surrounding hair to help them stay in place. After looking around online, I realized that some people are making headbands with velvet ribbon on the bottom- which keeps them from slipping. I have made three already and 1) I LOVE them and 2) gosh darn, they don't slip!
Click here to see the tutorial that I followed
Not only that bloggers post extremely helpful, but I also think that her blog name is really cute "Holy Craft".
Here are some pictures from the headbands that I made!:
| Close up of my first headband |
| Yes Dad, I'm being silly. It was late.. |
| Another side picture |
Monday, June 20, 2011
Today Is Our 3 Year Anniversary!
8 years ago, I met a guy down my dorm hallway..
Today is our 3rd wedding anniversary!
I love you hun!
Before you..I wasn't sure if I believed in marriage & I didn't know if I ever wanted to have kids. Shortly after I met you that all changed. I knew that I wanted to be your wife & have a big family. You have make me so happy & I can't wait to start a family!
Love ya,
Zandria
Saturday, June 18, 2011
Rummage/Craft Sale FAIL & Knitting
Good Evening,For awhile now, I have been looking forward to a craft/rummage sale that was at a high school very close to my house. I have been to sales like that at other places before & found a lot of nice things (like Christmas Decorations, craft ideas, crystal candy dishes & plates, etc) so I had high hopes for today. Let me tell you, this sale actually had all JUNK.. and there wasn't much junk at that. All the other craft/rummage sales that I have been to used 2-3 large rooms for their sales. This was all inside of one gym! I almost thought that I found an awesome chandlier. The box was in perfect condition & it looked like it had been never opened. When I opened it, it turns out to be a few glass globes of a total different design, no chandelier, & one of them was even broken! Fail! I know that many of the crafters I follow would say that one person's junk is another person's treasure..but unless you wanted a stuffed animal, you would have been out of luck.
Two things that I learned from today:
-The economy can affect how much people are willing to put in a rummage sale or what they consider junk (at least that is my deduction of the sale)
-The other thing is..don't assume that you are always going to find a gem when you are "rummaging", it may be strictly someone else's junk!
The benefit of going, however, was that I got to see two people from church that I haven't seen for awhile :) So it wasn't a total loss.
On another note, I am knitting a scarf. A day or two after I took the picture of my practice knitting project, I decided that I had enough practice & wanted to actually make something. I switch to size 8 knitting needles & a thicker multi-color ocean-esque thread. I will post pictures of it when I am done! I don't want to jinx myself. I will say that the scarf looks much better then my first practice project :)
Until later,
Alex
Thursday, June 16, 2011
From Scratch
In the last two years I have realized how much I HATE wasting money. Two years ago, the problem that I was most often running into was throwing away food that we didn't eat in time. Well in the last 6 months, my husband & I spend at least $100 less a month on groceries because we 1. cut out some snacks (we were buying too much) and 2. we buy less so that we don't have to throw out food. Keeping those changes in mind, I still have thrown out a handful of bananas. In the back of my mind, I always thought "I could make banana bread with those" but I was always too nervous to bake banana bread from scratch.
I am AWESOME at baking something from a box, but from scratch...well I have very little confidence & very little experience. I tried making an apple pie last year and that was OKAY. But today I believe that my banana bread was pure SUCCESS!
This is the recipe that I used, which is not my own. I did everything that she recommended other than adding walnuts-we didn't have any...but we did have all of the other ingredients. Click Here to view the recipe.
Here are some pics:
| I was going to attempt to use my bread maker for the first time, but I couldn't make sense of the directions, so I used the oven! |
| This is what the mixture looked like before I put it in the oven. It may be darker than normal because I used non-bleached wheat flour. |
Labels:
Baking
Wednesday, June 8, 2011
I Can KNIT
So...it has been a goal of mine to know how to knit or crochet for the last few years. I have had three women try to show me how to crochet: a roommate, my aunt, & my husband's grandma. I never followed up with those people after I learned & I don't remember going home feeling that I could do it on my own.
This summer I decided, enough is enough! I am going to learn to knit or crochet & be able to do it by the end of the summer, darnit! Why?? Because I want to be more self-sufficient. I want to be a blend of the modern woman & the quintessential 50s woman. I want to be able to make my house look beautiful, my husband & kids feel special, yet still make a lot of decisions around the house! I love the fact of being able to personalize things too. If I want a neon green & hot pink scarf & I can't find it in the store..I can make it!
So anywho, I recently found out that there was a crocheting circle in my family. Well, I thought it was a crocheting circle, then I re-read a fb post about it & the woman that invited me said "knitting circle". I ran out to Hobby Lobby an hour before the circle meeting & bought some knitting needles. I showed up at the meeting to find out that they do both (crocheting & knitting). So since I have given crocheting a try 3 times, I decided to try knitting for a first time. Here is what I have accomplished since yesterday:
This summer I decided, enough is enough! I am going to learn to knit or crochet & be able to do it by the end of the summer, darnit! Why?? Because I want to be more self-sufficient. I want to be a blend of the modern woman & the quintessential 50s woman. I want to be able to make my house look beautiful, my husband & kids feel special, yet still make a lot of decisions around the house! I love the fact of being able to personalize things too. If I want a neon green & hot pink scarf & I can't find it in the store..I can make it!
So anywho, I recently found out that there was a crocheting circle in my family. Well, I thought it was a crocheting circle, then I re-read a fb post about it & the woman that invited me said "knitting circle". I ran out to Hobby Lobby an hour before the circle meeting & bought some knitting needles. I showed up at the meeting to find out that they do both (crocheting & knitting). So since I have given crocheting a try 3 times, I decided to try knitting for a first time. Here is what I have accomplished since yesterday:
Well it may not be the best knitting work in the world & I may feel like an gorilla with two knitting needles...but its almost a day later & I still remember how to do it. So far, I am going to say that I find learning how to crochet easier than knitting. Grant it, I did try to learn how to crochet when I was younger...so I'm not sure if that made a difference.
My revised craft goal of the summer: feel comfortable with knitting by the end of the summer & learn how to crochet by the end of the summer. I want to learn it all!
I will be a part of the knitting circle as long as my schedule permits it! It was a great time, by the way!
Tata until later!
-Alex
Sunday, June 5, 2011
Magnetic Words
This is my second post on making something for the fridge, but hey its a giant surface that you stick all kinds of things to, as long as they are magnetic. For a while I have wanted to make my own words on magnets for our fridge. Why? 1) Its cheaper to make them then to by an already made kit 2) if you make it yourself it is tailored to your own personality AND 3) I love making things. I made some magnetic words for our house but I will also be making another set tonight for someone else tonight.
This pdf was helpful to get my set started How to.... and here.
Here's what you need:
-A computer, printer, & a word program (unless you want to write them out with pen or perm. marker)
-A magnetic sheet (I used Adhes-A-Mag Magnetic Adhesive Sheet which is 12 x 24 in.). I got it from Michael's because I already had a gift card there. If I didn't have the gift card, I would have bought 8 x 11 sheets on the oriental trading post website
-Computer paper
-Scissors
-An imagination
The Steps....
1) Open a Word document (or whatever program you choose to use) and change the settings. I changed the page margins to .4 & the page setup as landscape. After each word I hit the space bar 4 times before typing another word to leave enough space to cut. I also made the spacing between each line 1.5 (its normally 1).
2) Add you words. This is completely up to you as to what words you use, which is why it is fun! Go to the link that I provided above. You at least need to make sure that you get a mix of nouns, verbs, adjectives, adverbs, exclamations, and articles. I also added things such as our names, our nicknames, our pets names, some of my favorite words (awesome, sweet, etc), some of my husband's favorite words (and some of them I left out because I want our fridge to be at a NC-17 level :) To make things fun for my hubby, I also looked up some lingo for his favorite movies. To do that, I just went to google & typed "Harry Potter lingo","Star Wars Lingo" etc. I also added a few things from Jersey Shore such as "blast in a glass", "walking holiday", and "situation". I included words from recent pop culture, thanks to Charlie Sheen that have regained popularity "troll", "warlock", and "tigerblood" to make it fun for our guests.
This pdf was helpful to get my set started How to.... and here.
Here's what you need:
-A computer, printer, & a word program (unless you want to write them out with pen or perm. marker)
-A magnetic sheet (I used Adhes-A-Mag Magnetic Adhesive Sheet which is 12 x 24 in.). I got it from Michael's because I already had a gift card there. If I didn't have the gift card, I would have bought 8 x 11 sheets on the oriental trading post website
-Computer paper
-Scissors
-An imagination
The Steps....
1) Open a Word document (or whatever program you choose to use) and change the settings. I changed the page margins to .4 & the page setup as landscape. After each word I hit the space bar 4 times before typing another word to leave enough space to cut. I also made the spacing between each line 1.5 (its normally 1).
2) Add you words. This is completely up to you as to what words you use, which is why it is fun! Go to the link that I provided above. You at least need to make sure that you get a mix of nouns, verbs, adjectives, adverbs, exclamations, and articles. I also added things such as our names, our nicknames, our pets names, some of my favorite words (awesome, sweet, etc), some of my husband's favorite words (and some of them I left out because I want our fridge to be at a NC-17 level :) To make things fun for my hubby, I also looked up some lingo for his favorite movies. To do that, I just went to google & typed "Harry Potter lingo","Star Wars Lingo" etc. I also added a few things from Jersey Shore such as "blast in a glass", "walking holiday", and "situation". I included words from recent pop culture, thanks to Charlie Sheen that have regained popularity "troll", "warlock", and "tigerblood" to make it fun for our guests.
3) After looking over your document, print out your words. I only used one page to fit all of my magnet words, by the way. Then, peel off the paper on the adhesive magnet, carfully place your computer paper on the sticky side of the magnet, smooth out, and cut out your words.
4) Put your words on your fridge! I used the top door so that they were at eye level.
5) Express yourself!
My hope is that my hubby & I, as well as our guests will have fun creating messages on the fridge while we happen to be in the kitchen. Our kitchen seems to be a popular place, so it is fitting to be a message center as well!
*My little disclaimer Here's the deal: There may be some grammatical errors in my post today, but I honestly feel too lazy to go through & look for them today!
Enjoy!
-Alex
Monday, May 30, 2011
Personalized Magnets
Its been almost 2 months since I've been on here, ooops! I've been busy with work & whatnot, but don't fret..I never intended on giving up on my blog. I should be posting more often from here on out!
So this weekend I made some magnets for our fridge. If you are craft-a-holic like me, you may even have all of the needed materials in your house!
I made the magnets because there isn't much of a choice of cute looking magnets that are cheap in price & strong...so why not. I am not the first to make glass marble magnets (by far), but they could possibly be the cutest!
Step 1: Cut out circles of scrapbook paper to fit the size of the glass beads. I cut purposefully for most of the circles, such as the paw prints. You can trace them & cut them with scissors or you can use a hole punch like I did. My hole punch was 3/4". You only need one circle per bead that you will be using. Some people use magazine pages by the way, but I was worried that they would be too transparent with the glue.
Step 2: Use school type glue to glue the circle to the glass bead (picture side toward the bead). Make sure that the entire bead (the flat side that glues to the paper) has glue covering the entire side. Also make sure that you don't have too much paper, so that you don't saturate the paper too much.
Step 3: Let dry overnight!
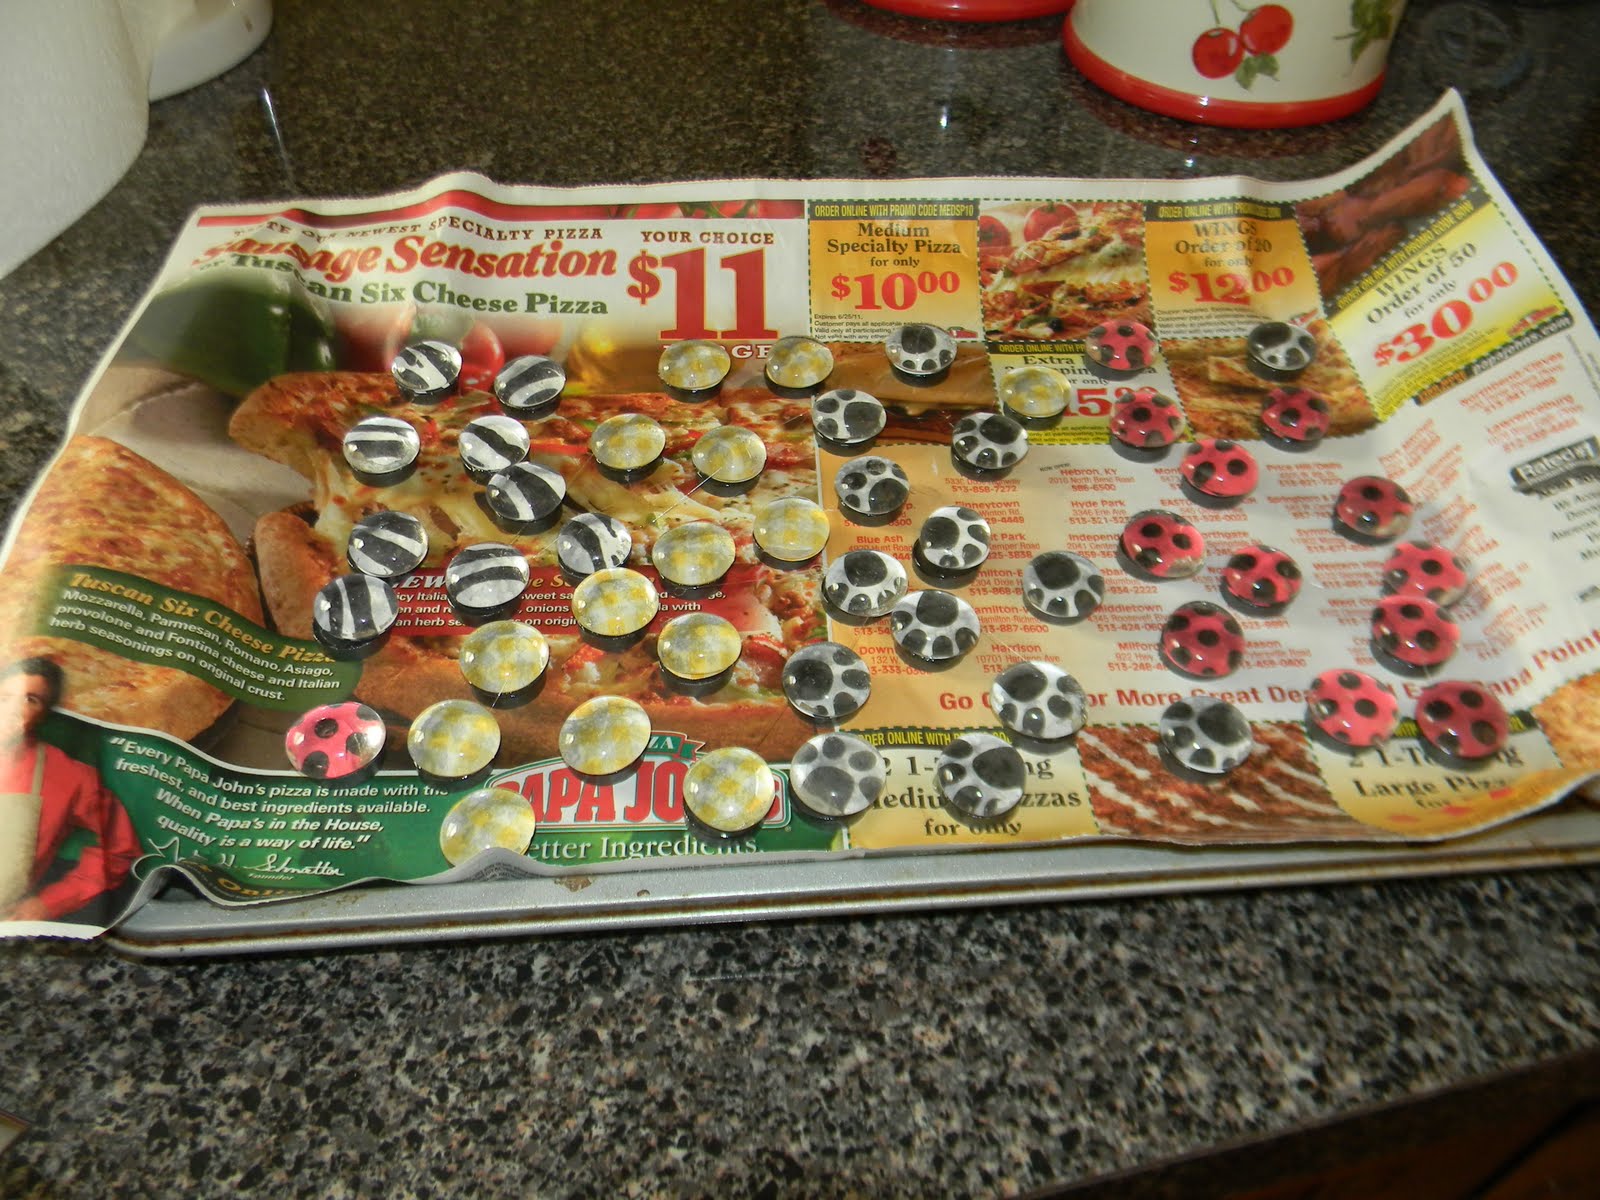
Step 4, 5, 6, & 7: After glass beads & paper circles are dry. For the next step, there are several types of glue that you can use, I used Surebonder 9001 (found at Hob Lobb) which doesn't require clamping (such as Gorilla glue). What I found easiest was to get a baking tray, cover it in a pizza ad (an additional step to prevent contamination to the baking sheet), and lay all the magnets out on top. I then smeared glue on the top of each magnet making sure that they were completely covered (but again not too much). I then took the glass bead paper combo a put one on each magnet. The benefit of using the baking sheet was that the magnets stayed in place & I could apply a lot of pressure on the magnet. My glue required that I let my project dry for 24 hours. I think I only had the restraint to wait 22.
*Please note, school glue will probably not be strong enough for these steps!
Step 8: After dried, take off of baking sheet (clean the baking sheet). & put the magnet on your desired magnetic surface!
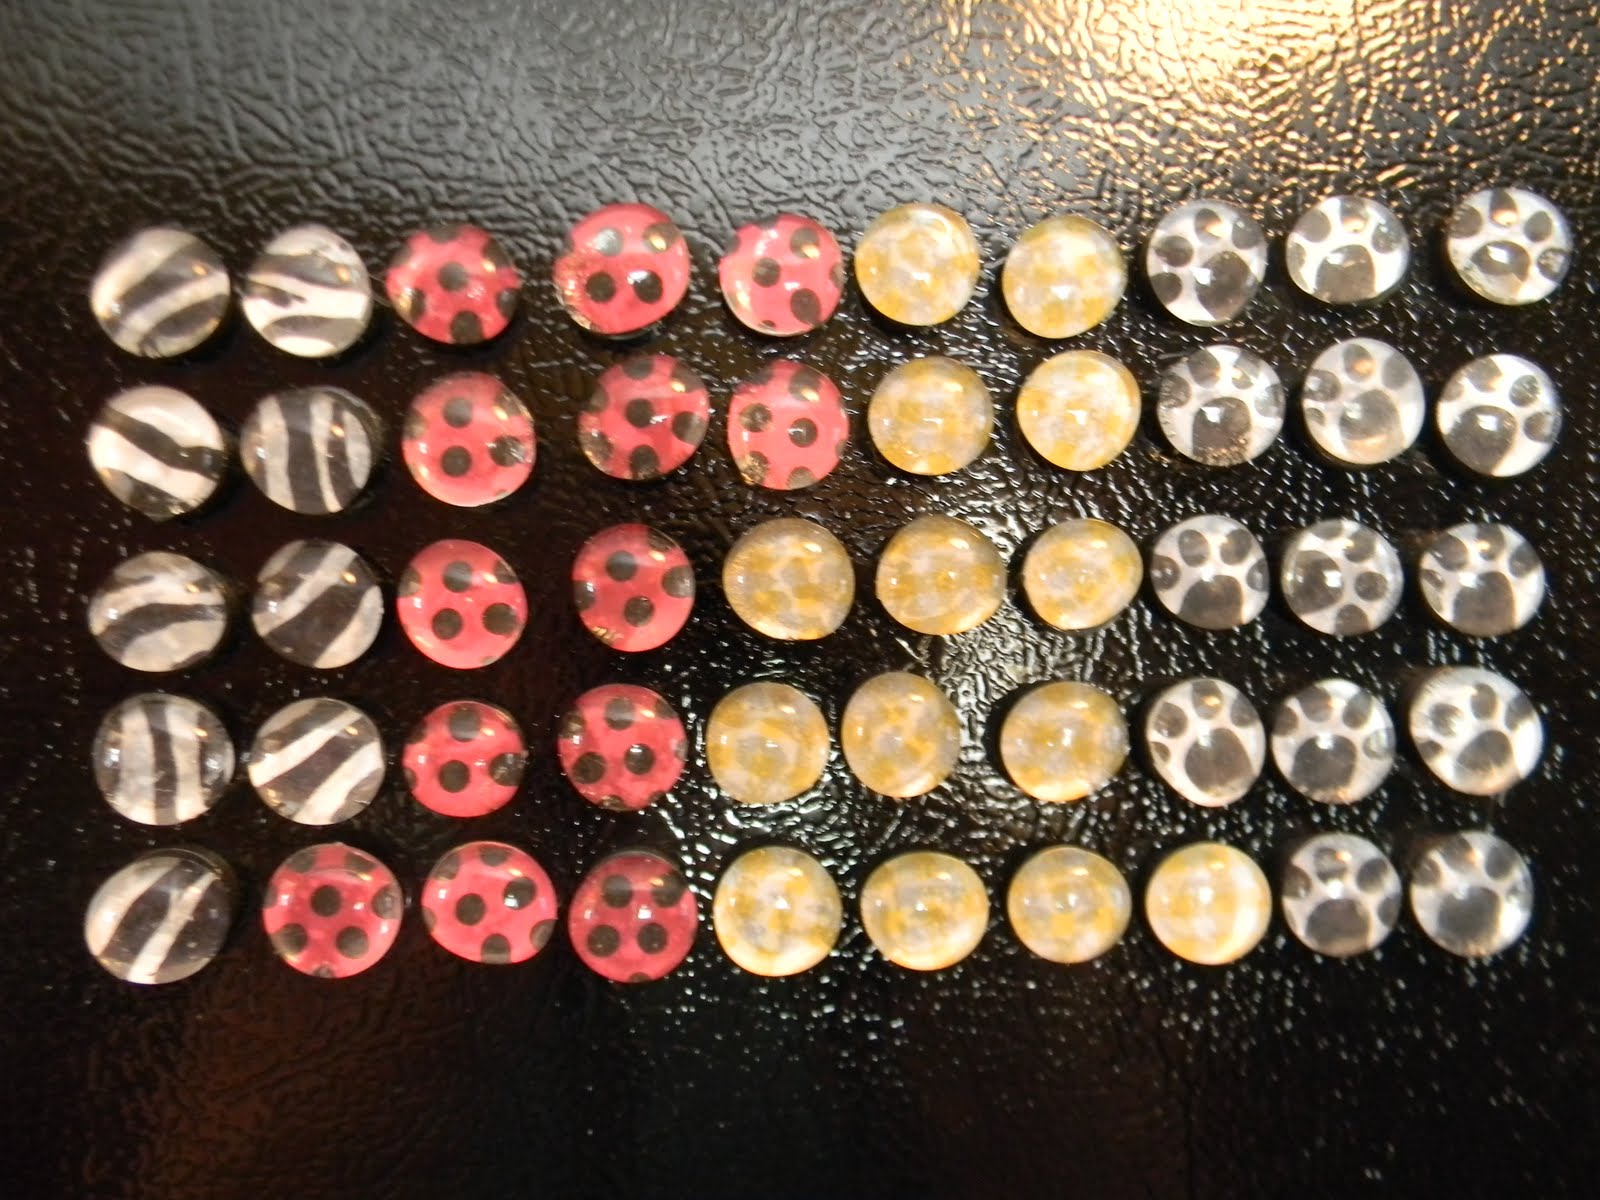
I used the particular designs because they match the colors of my kitchen. The red one was supposed to just look like red with black polka dots, but with the bead..they look more like lady bugs! I still love them though. The yellow & white magnets turned out the worst out of all of them. The paper was a light yellow and white checkered design. I think that the glue saturated the paper too much. They still look nice, its just hard to tell what the original design was.
If you have small children in the house make sure to keep these magnets away from them!
Enjoy!
-Alex
So this weekend I made some magnets for our fridge. If you are craft-a-holic like me, you may even have all of the needed materials in your house!
I made the magnets because there isn't much of a choice of cute looking magnets that are cheap in price & strong...so why not. I am not the first to make glass marble magnets (by far), but they could possibly be the cutest!
Step 1: Cut out circles of scrapbook paper to fit the size of the glass beads. I cut purposefully for most of the circles, such as the paw prints. You can trace them & cut them with scissors or you can use a hole punch like I did. My hole punch was 3/4". You only need one circle per bead that you will be using. Some people use magazine pages by the way, but I was worried that they would be too transparent with the glue.
Step 2: Use school type glue to glue the circle to the glass bead (picture side toward the bead). Make sure that the entire bead (the flat side that glues to the paper) has glue covering the entire side. Also make sure that you don't have too much paper, so that you don't saturate the paper too much.
Step 3: Let dry overnight!
Step 4, 5, 6, & 7: After glass beads & paper circles are dry. For the next step, there are several types of glue that you can use, I used Surebonder 9001 (found at Hob Lobb) which doesn't require clamping (such as Gorilla glue). What I found easiest was to get a baking tray, cover it in a pizza ad (an additional step to prevent contamination to the baking sheet), and lay all the magnets out on top. I then smeared glue on the top of each magnet making sure that they were completely covered (but again not too much). I then took the glass bead paper combo a put one on each magnet. The benefit of using the baking sheet was that the magnets stayed in place & I could apply a lot of pressure on the magnet. My glue required that I let my project dry for 24 hours. I think I only had the restraint to wait 22.
*Please note, school glue will probably not be strong enough for these steps!
Step 8: After dried, take off of baking sheet (clean the baking sheet). & put the magnet on your desired magnetic surface!
I used the particular designs because they match the colors of my kitchen. The red one was supposed to just look like red with black polka dots, but with the bead..they look more like lady bugs! I still love them though. The yellow & white magnets turned out the worst out of all of them. The paper was a light yellow and white checkered design. I think that the glue saturated the paper too much. They still look nice, its just hard to tell what the original design was.
If you have small children in the house make sure to keep these magnets away from them!
Enjoy!
-Alex
Friday, April 1, 2011
Tennis Ball Birthday Cake
I am not the best with frosting in a creative manner or making food into objects that other people can recognize. I think that today I did pretty well, however. My MIL had to work this morning & has a lot going on this week, so I offered to make my little BIL's 15th birthday cake! He just started playing tennis, on a team, so a tennis related cake seemed to be in order. My first thought was a drawn tennis racket on the side of the cake. Its a good thing that I did not go through with it, it probably would have looked like a roughly drawn hair brush, LOL.
I used two boxes of Betty Crocker confetti cake. It was on sale for $1 a box! I go between Betty Crocker & Pillsbury, neither have steered me wrong. I made the cakes in two seperate 9 x 9 pans. Jay flattened off the top of the soon to be bottom layer by using a bread knife. I then cut some of the edges off of the top layer.
| The icing & food coloring used. I *LOVE* my neon food coloring! Each container of icing required 30 drops of neon green food coloring to be the awesome Wilson tennis ball color! |
| The layers before I added them together. I actually thought they would fit in my glass cake stand. Good thing that I tested this theory out before I frosted the cake! |
| Looks yummy right? |
| First layer. I thought of keeping it white, but then, won't it be more fun to cut into the cake to see more GREEN frosting :) ? |
| The beginning of the "felt". I used a Pampered Chef Icing Tool to make the texture. |
| Its almost done! I did spread the white part a little more. This is the result of 3 containers of white icing! |
| Ta da! I don't have the best handwriting, in icing, but you can at least read it :) |
What is the coolest baked item that you ever made?
Tuesday, March 29, 2011
Plastic Easter Egg Wreath
Its been quite a while since my last post. A lot have things have happened during that time. My grandpa passed away, I have been to Toledo 3 times in the last month, & having two jobs keeps me pretty busy as well. I will post all of the crafts that I have made since my last post- today. Hopefully things have returned back to normal & I will post more often :)
I have wanted to make a plastic easter egg wreath ever since I saw one somewhere online last Easter. After looking at several tutorials, this is the one that I used to make my wreath:
http://cindis.blogspot.com/2009/03/moms-do-some-grass-this-month.html
I will not list out the directions again, since Cindi did a pretty good job the first time :) To make my wreath I used an old box that we had left over from moving into our house, easter grass that I already had, coordinating ribbon from our wedding, hot glue/hot glue gun, & the easter eggs were the only thing that we had to buy! My wonderful husband bought me a pack of 140 for $5 at Walgreens :) If you don't mind putting the eggs together, they are a great deal!
I have wanted to make a plastic easter egg wreath ever since I saw one somewhere online last Easter. After looking at several tutorials, this is the one that I used to make my wreath:
http://cindis.blogspot.com/2009/03/moms-do-some-grass-this-month.html
I will not list out the directions again, since Cindi did a pretty good job the first time :) To make my wreath I used an old box that we had left over from moving into our house, easter grass that I already had, coordinating ribbon from our wedding, hot glue/hot glue gun, & the easter eggs were the only thing that we had to buy! My wonderful husband bought me a pack of 140 for $5 at Walgreens :) If you don't mind putting the eggs together, they are a great deal!
Some things I would change: 1) If I had picked out the eggs, I may have picked out pastal colored eggs 2) I would have liked to have a large bow on the top of the wreath, but I don't know how to make those & 3) if I picked out the grass for this project I would have picked something out that was lighter & more see through.
So, what do you think?
Subscribe to:
Posts (Atom)